Welcome

*****Skyote #88 gets Bronze Lindy for "Airventure-Oshkosh 2016 Plans Built Champion"******


October, 2007

Welcome to "Skyotelog", the build record of Skyote #88. I assume that you are familar with the Skyote biplane. If not, you should visit http://www.skyote.org/ for a complete introduction to this unique but elusive biplane.

The posts are presented in reverse chronological order (newest first). Or you can click on one of the "Labels" to see all of the posts concerning a specific topic. Click on any photo for a larger image.

All my building experience is limited to Van's RV's so I have no experience with building tube and fabric or "plans building". I have much to learn so take everything I write with a grain of salt and reasonable skepticisim.


I do not intend to follow a "traditional" path for the construction of #88. I intend to employ low level technology and $ to reduce the construction time and difficulty where possible and practical. By low level technology I am referring to CAD, laser, waterjet, CNC. For example:

  • I have purchased a complete wing spar kit from Jerry Kerr.
  • A rib kit from Mr. Bartoe.
  • Brunton Flying Wires and Drag wires from Harvey Swack.
  • CNC profiled tube kits for the fuselage, tail feathers and landing gear from VR3.

In addition I have converted all of the wing fittings, brackets, links, lugs etc. to CAD and had them cut by water jet. I have designed a laser cut wing spar drill template/jig which positions the five spar components so that all of the holes can be drilled in a complete spar as an assembly. I plan to continue converting as many parts as I can to CAD so that I can reduce the "hand-made" components to a minimum.

Note: As of June 2015 I have over 100 CAD files which provide 600+ water jet cut parts for the Skyote.


While it takes a little time, converting the design to CAD is a great way to truly understand the drawings. plus a huge amount of information has been extracted from the rather complex drawings. This can be a great help to others in understanding and interpreting the design.


The Skyote is uniquely suited for conversion to CAD in that a "computer" was used in it's original design. I have read that Mr. Bartoe used a HP calculator to "compute" the design and dimensions of the Skyote. The plans show all of the critical dimensions to three decimal places for X,Y and Z axes.


Amazingly, when I put the design into CAD the resulting 3D models agree with Mr. Bartoe's thee decimal place dimensions about 99.9% of the time. I have found one discrepancy but less than 0.030"!


If you want to build your Skyote as cheaply as possible, or if you enjoy handcrafting the same parts over and over again then my approach to building is not for you!


If you want to build your Skyote in the minimum possible time with highly accurate parts then this approach may be the answer. I personally get a lot of satisfaction out of organizing the project so that it can be produced accurately. Hopefully some of this work will prove useful to others in the future.


Comments are welcome. I will respond as time permits

To receive email notices of new posts just enter your email address in the block at the left. It will be confidential, only Google will know!

Saturday, December 27, 2008

Engine/Cowling Model


I refined the engine/cowling model a little. I still need to add the cooling ram air ducts and some simulation of the 6 into 2 exhaust system. Pete Bartoe is lending us the forming blocks he used to form his nose bowl. The orange part is the battery which needs to go up front to help with the CG. The battery will be supported by a subframe off the engine mount. It looks like most of the exhaust and ram air ducts will be outside the cowling.

Wednesday, December 24, 2008

Saw and Sand Time

Time to make a few parts by the traditional saw and sand method.

Templates for the Tip Bow Straps.

Floorboards


Seat Bottom

I used 3M adhesive to glue the templates over the protective plastic on the aluminum sheet stock. Just peel the plastic off when you are finished with no messy adhesive clean-up.


Friday, December 12, 2008

Avionics Console


(Ed. note: This idea was discarded in favor of panel mounted units. See post of Jan 2nd.)
This is a CAD model of the avionics console which will house the MicroAir comm. and transponder units. It will be located on the floor between my feet. It will also contain the headphone jacks and the avionics master switch. I will likely need some holes or slots for ventilation.


The second model has the cover removed. The MicroAir comm. and transponder are not actually the same size. I just made up a composite model using the larger of the HxWxL dimensions from the respective units.


This is the flat pattern blank for the face/base plate for the console. Looks like a good prospect for waterjet! Would be much easier to bend up if it were made in two pieces and riveted together

Wednesday, December 10, 2008

Paint Update


The primer I used initally didn't stand up to the MEK test so I switched to PPG brand DP40-LF. It works well and has good resistance to MEK after it cures a week or so.


I dropped my 30 year old POC touch-up gun and broke it so I was forced to treat myself to a new primer gun. I find myself priming many batches of small parts so I needed a small capacity gun suitable for priming. I bought this little gravity feed gun from Lowe's for $39.95 less a $10.00 off coupon. It works just fine for primer and gets about three times the milage from the paint as the old siphon gun did.

Monday, December 8, 2008

Instrument Panel

It's about time to cut the instrument panel so I now have an excuse to waste endless hours contemplating the panel layout. My first objective is to keep it simple. The King AV80R satisfies this requirement as it can be surface mounted on the panel and only requires a 12 volt power plug to operate. The Grand Rapids EIS 6000 is desirable to help tune and manage the EGT/CHT temps for the Jabiru 3300.


The 3-1/8" instruments will be altimeter and air speed while the small instruments include G-meter, turn & bank, and compass.


The MicroAir comm and transponder will go in a small console on the floor between my legs.

Match Drilling Spar Fittings

Match drilling Spar fittings with the fitttings installed on the spars can be akward leading to inaccurate drillng. We assembled the fittings to a small piece of spar and used a jig to hold it at the 7.2 degree angle. This allowed the fittings to be matched drilled and reamed in the drill press for better accuracy.


Friday, November 7, 2008

Wire Mesh Paint Table


This paint table works very well. I tacked up a 10'x2' frame from 2x4's and covered it with 1/2" mesh hardware cloth. It works much better than painting on a flat table top because the air from the spray gun does not reflect back. This eliminates the tendency for parts to be moved by the blast from the gun. It also improves the paint coverage as the paint tends to wrap around the bottom edge of the part.

Tuesday, November 4, 2008

AircraftPaintSchemes.com


I am working with AircraftPaintSchemes.com so we can have "paint templates" for the Skyote. I sent them three view drawings of the Skyote for conversion to their template format. They emailed the side view template today and promised the top view next week. The above are "quickie" examples . I highly recommed that anyone who is interested go to www.aircraftpaintschemes.com and down load the free software and instructions. Examples are provided for practice and understanding the software.
Hopefully the Skyote templates will be available by sometime next week.

Thursday, October 9, 2008

Spar Party # 3

Greg Swanson now has a complete set of drilled spars for his Skyote. Greg drove over in early October and with Tom's help we managed another 4-1/2 hour spar drilling session. This is the third complete sets of spars to be drilled using these jigs. That big smile is because Gregg is drilling the last of eight spars for his Skyote!


Marking all of the components before disassembling and packing for the return trip.


Alabama bound!

Great Picture


David Teel sent me these pictures of the wings he and Glenn have built for Glenn's Skyote. A real work of art. If you check previous posts in this blog you will see that the spars for these wings were just drilled August 15, 2008. A tip of the cap to Glenn and David for such beautiful and speedy work!

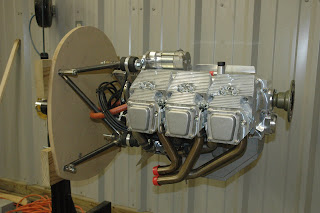
Engine Mounted on Stand


I decided to make up two engine mounts. The "prototype" above is made from scrap tubing and tack welded by me. I also cut out a profile of the firewall using MDF and mounted it with the engine. I will use this rig to locate all of the firewall forward components and to design the cowling. I still have to locate the diagonal brace between the left and right sides of the mount.

The second set of tubes will be welded by Dale after we are sure that everything is set with the prototype mount.

Saturday, September 27, 2008

Engine Mount


Started work on the Engine mount this week. I had originally planned to let Jabiru USA design and make the engine mount but after 3 months and no mount, I decided to do it myself. The photo above shows the initial tube fitting fixture. These tubes were profiled using a little piece of free sofware called "Tubemiter". You can Google it or you can go here: www.ozhpv.org.au/shed/tubemiter.htm


The program only works for the intersection of 2 tubes. You just input the diameters of both tubes, wall thickness and angle of intersection. The program then provides a flat pattern which you print and wrap around the tube as a notching guide.


This is a poor man's version of CAD for tube mitering but it works very well. You are still responsible for determining tube length and correctly indexing the notches on each end of the tube.

Wednesday, September 24, 2008

Aileron Nose Skins


This is our first crack at forming the aileron nose skins. So far, this has been very difficult and we have not made a satisfactory skin. The amount of bend achievable with the above rig is not sufficient, leaving too much "fight" in the skin.

Update: Dale Doane was able to finish the bend of the nose skins using a set of slip rolls.

Wednesday, September 17, 2008

More Tank Progress


The Header and Reserve tanks strapped in the approximate correct position. We are trying to figure out the best option to fill the reserve tank. It could be filled through the header tank with a valve between or it could have its own independent filler with no connection between the tanks.

Tuesday, September 16, 2008

Center Section Progress


We have resumed work on the center section. Tom had completed the frame work last Fall but we had put it aside to work on other things. The 0.050" bottom shear plate has been fitted in the above photo.


We used a stretcher to curve the shear plate stiffener angles.


Yours truly drilling the top skin. This skin is secured by screws/nutplates. The leading edge skin is next.

Reserve Tank Model


This is a foam model of the reserve tank which will fit above the rudder/brake pedals and below the original header/fuselage tank. The capacity is 6 gallons. We put it in the airplane last Sat. and it fits well. (Forgot the camera) More pictures soon.

Tuesday, September 2, 2008

Blakesburg 2008

I made my first visit to the Blakesburg, IA fly-in this year. Blakesburg is a truly unique experience. No asphalt, no concrete, no commercialism. Just 350 or so superb antique aircraft parked in the grass with quite a bit of fly-by activity as an added bonus.


We had a nice gathering of Skyote owner/builders. From left to right: Hawkeye Hughes, Greg Swanson, John Roberts, David Teel, Glenn Bridges, Mike Kukulski, Dick Smith, and Dave Novak. Hats off to Dave for flying his beautiful Skyote in from Wisconsin.


That's Doc Packard in the center. Dick Smith on the left and Glenn Bridges on the right.
Doc was not present when we made the group photo. He bought his Skyote at age 67 and says he rolled it more than 4000 times before age made him give it up! Doc said he rolled the Skyote every time he flew it. That should be an inspiration to us all.

The tall guy is George Becker from Boulder, CO. George worked for Pete Bartoe at Ball Aerospace and made many of the parts for the original six airframes. George had some good comments on Mr. Bartoe and the Skyote.


This is Dave Fisher. Dave was the original owner of Hawkeye's airplane.

I really enjoyed meeting and talking to all of these people. As one might suspect, Skyote builder/owners are very interesting characters!

Friday, August 15, 2008

Spar Party


Glenn Bridges and David Teel spent the day using our laser cut spar drill jigs to drill up all of the spars for Glenn's Skyote #89. Tom and I had pretty well perfected the process while drilling the spars for Skyote #88 so things went very smoothly today. We were able to drill all of the holes in all eight wing spars in about 4.5 hours of actual working time. The laser cut sprar jigs have been a great help in completing the spars quickly and accurately.


All drilled up and ready to go home!

Saturday, August 9, 2008

Control Horns and Bell Cranks


The control horns and bell cranks have been primed and riveted ready for installation.

Tail Feathers Complete (99%)


The tail feathers are about 99% complete. The VR3 kit had no problems and Dale did his normal super job on the welding.

Friday, July 25, 2008

The Firewall Fits!


We had a chance to check out the stainless steel firewall today with good results. The part was cut by waterjet complete with 75 rivet holes for the perimeter angle and the main engine mount holes.